While gardening is an excellent and fun way to garner skills of self-sufficiency, some plants can be a pain when it comes to maximizing their crop production.
Pepper plants in particular can pose a challenge for beginner gardeners battling the uneven ratio of blooming flowers and robust peppers.
Luckily, expert gardener Marv (@plantedinthegarden) took to TikTok with the ultimate guide to producing peppers that will make your fellow gardeners jealous.
The scoop
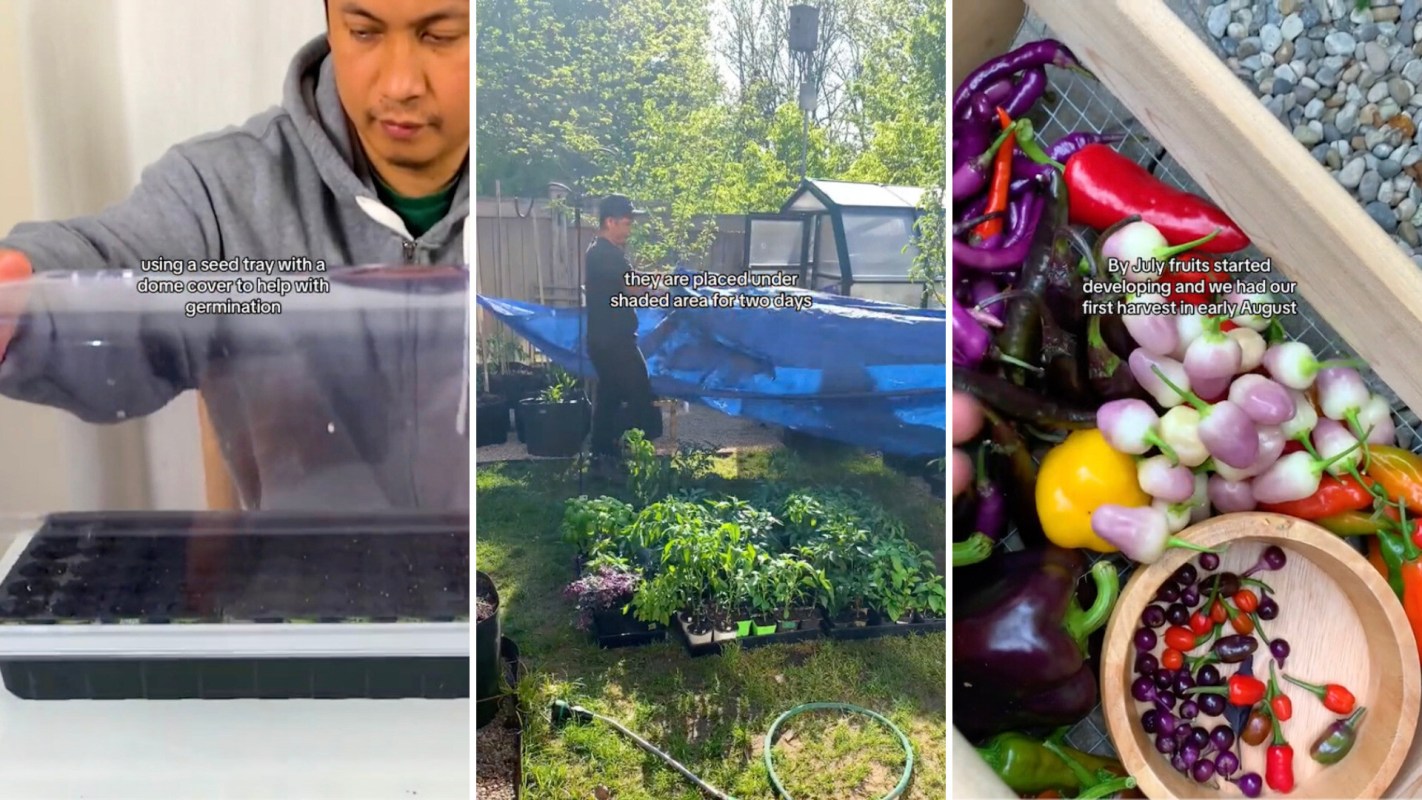
Marv begins the pepper's life journey as a seed using a seed tray and a dome cover to help with the germination process — where the seed will grow into a seedling.
With this process starting in January, the seed tray can be kept indoors and will continue to grow throughout the winter and early spring months. Once the seeds have sprouted, however, the dome cover can be removed, and a grow light can be introduced.
@plantedinthegarden The Pepper Growth Timeline: How to successfully grow productive pepper plant I seed started indoors early January because we live in a winter zone. Using a seed tray with a dome cover helped with quick germination. The tray does not need to be under a grow light, but needs to be in a warm spot. I planted 2 seeds per cell to ensure a good germination rate. Once the seeds have sprouted, the dome is removed. For strong indoor grown seedlings I used a grow light, this prevents them from being tall and lanky. When they have 4 true leaves, they are potted up and topped off after 1-2 weeks. Removing the top stem and leaves encourages new branches to grow which makes the plant stronger and be more productive. When early flowers start to appear, I carefully remove them so that the plant can focus on growing. By the end of May the weather was warm enough and I slowly introduced the plants to the outdoor environment by placing them in a shaded area for 2 days, then late afternoon sun for another 2 days and finally full sun for 2 more days. This process is called hardening which prevents the plant leaves from getting burned by the heat of the sun. By the first week of June they are transplanted into their final spot. I grow mainly in containers from 5 gallon and up. 1 plant will do well in a 5-8 gallon container and 10 gallon and up, 2-3 plants can fit. My soil mix consists of equal parts coir, perlite and compost. During transplant, I added chicken manure granules, gypsum and rock dust for minerals. Then every month, I fertilize with a handful of chicken manure granules and I water every other day. For pest control, the lady bugs took care of aphids for me and I used traps for flies. By July, the fruits started developing. Good airflow is a must to help with pollination or plant flowers nearby to attract pollinators. By August, fruits started to ripen and we had our first harvest of the season. #learning #gardentok #gardening #peppers #gardeningtips ♬ original sound - Planted in the Garden
When the peppers grow at least four good-sized leaves, they can be repotted on their own to prepare for their journey into the garden or larger outdoor pots as warmer temperatures approach in May.
TCD Picks » EDF Spotlight
💡EDF's Vital Signs newsletter delivers stories about game-changing solutions close to home and around the world


There is a crucial aspect in introducing your pepper plants into the outside called "hardening," as Marv points out.
Hardening consists of introducing your plants to a shaded area for a couple of days first, then a partly shaded area, and finally in full sun for the remainder of the season — roughly from the first week of June to early September. This prevents the plant leaves from potential sunburn.
Finally, a mixture of healthy soil, compost, and natural minerals provides the key to success for sustained pepper plant health.
"By July, fruits started developing, and we had our first harvest in early August," Marv explains at the end of the video, which shows a beautiful array of freshly-picked peppers in a basket.
How it's helping
Gardening and tending to crops is an incredible hobby that reduces stress and leaves you with a sense of fulfillment and an unparalleled connection to nature. However, knowing the proper methods can maximize your food production beyond what many think possible.
With Marv's thorough guide and expertise, a new generation of gardeners can have access to an arsenal of information that doesn't require loads of money and energy to access.
Some good old-fashioned encouragement goes a long way, too, as it is not uncommon to feel discouraged when money is wasted on store-bought plants dying or not producing.
Growing your own food can save you money in the long run if done right. It's also better for the environment to eat from your own backyard. Eating what you grow means less energy is spent on transporting and packaging food.
By taking the reins back from big box stores, you can unleash your inner garden pro thanks to start-to-finish guides like these.
What everyone's saying
Viewers of the TikTok were quick to voice their appreciation in the comments.
"This is so helpful," commented one user.
"Tons of great info," added another.
Others were simply excited to get started with their newfound gardening knowledge.
"I cannot wait to live like this!" says one future gardener, adding the hashtag "next year goals."

Join our free newsletter for easy tips to save more, waste less, and help yourself while helping the planet.